Improvisation I
A Constraints Led Approach
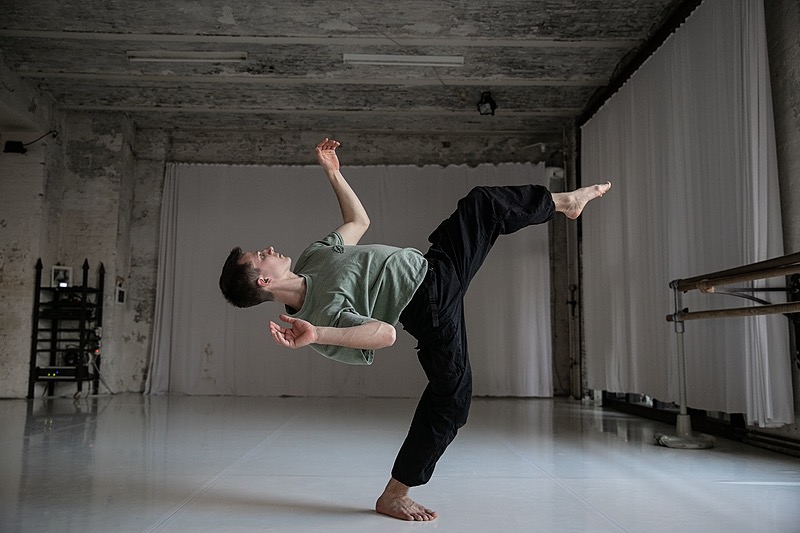
This course is part of a series in which we use improvisation as a medium for exploration and learning.
Across 10 classes, we will research a variety of tasks together, problem-solve, and discover how exploring within constraints can lead us to solutions that align with our own current abilities, while at the same time, if properly manipulated, consistently challenging us to expand the boundaries of our capacities, improve our skills and deepen our understanding of our structure.
Standing, moving on four limbs, or lying on the floor - working at all levels and learning to transition between them - we will aim to improve coordination, kinesthetic intelligence (awareness of and sensitivity to your body in motion), and the ability to move with creativity. We will draw inspiration from contemporary dance, capoeira, breakdance, athletics, and Fighting Monkey practice, building a wide vocabulary of dynamics, configurations, and qualities the body can display.
The course is open to all levels, with tasks progressively structured to offer space for each individual to learn and explore from where they are. It is dedicated to curious movers of any background or specialization.
Improvisation adds another layer of understanding to one’s movement journey, which is why it represents a core part of our practice. Through this series, we hope to share how and why it is so essential, and to offer you something you can carry with you and dance with throughout your life.
All classes can be practiced from the comfort of your home. While more space may offer a richer experience in some situations, it is not a requirement to explore the course material fully.
LIFETIME ACCESS
2-3 Months Split Payment Regulation
Each month, you’ll be charged a specific amount on the date of your first payment, depending on whether you choose the 2, 3 or 4 installment option.
Choosing a payment plan means you are committing to the full course fee. Instalments are offered as a convenience, not as a subscription, trial period, or partial-access model.
By selecting a payment plan (2 or 3 instalments), you agree to complete all scheduled payments.
Access to the course or bundle during the instalment period is conditional. Course activity and progression are monitored to ensure usage aligns with normal learning patterns.
If activity significantly exceeds what is typical before all instalments are completed, we reserve the right to:
• temporarily restrict or suspend access
• contact the student to clarify usage and ensure it aligns with the intended learning experience
• require immediate settlement of the remaining balance if it is the case
Cancellation of future instalments is not permitted once any course material has been accessed.
Refunds, if applicable, are subject to the conditions stated in our Refund Policy.
Refund Policy
Because this is a digital educational product with immediate access to the full course content, we offer a limited refund window under the following conditions:
• Refund requests must be made within 3 days of purchase.
• You must have accessed no more than 25% of each course included in your purchase.
• If eligible, 80% of the payment will be refunded.
• 20% is retained as an administrative fee.
Course curriculum
-
1
Introduction
-
Disclaimer
-
How To Use This Course - Guidelines and Tips
-
Resources
-
-
2
Class 1
-
Task 1 (Explanation) - Eyes & Spine - Squats & Arches
-
Task 1 (Explanation 2) - Eyes & Spine - Squats & Arches
-
Task 1 (Demonstration) - Eyes & Spine - Squats & Arches
-
Task 2 (Explanation): Arms Circles and Squats - Relations
-
Task 2 (Demonstration): Arms Circles and Squats - Relations
-
Task 3 (Explanation): Half Squat and Steps
-
Task 3 (Demonstration): Half Squat and Steps
-
Task 4 (Explanation): The Windmill
-
Task 4 (Demonstration): The Windmill - Pattern Demonstration
-
Task 4 (Demonstration 2): The Windmill - Pattern Demonstration
-
Task 4 (Demonstration 3): The Windmill - Full Task
-
Task 5 (Explanation): Eyes and Spine - From Standing to Quadrupedal
-
Task 5 (Demonstration): Eyes and Spine - From Standing to Quadrupedal
-
All Together (Explanation)
-
All Together (Demonstration)
-
-
3
Class 2
-
Task 1 (Explanation): Waves & Ripples From Feet Up
-
Task 1 (Demonstration): Waves & Ripples From Feet Up - Simple
-
Task 1 (Demonstration 2): Waves & Ripples From Feet Up - More Complex
-
Task 2 (Explanation): Deeper Waves
-
Task 2 (Demonstration): Deeper Waves
-
Task 3 (Explanation): Turbulent Waters
-
Task 3 (Demonstration): Turbulent Waters
-
Task 4 (Explanation): Head Feet Relation - Curving in Space
-
Task 4 (Demonstration): Head Feet Relation - Curving in Space
-
Task 5 (Explanation): Falling Into Space - Leading With Head
-
Task 5 (Demonstration): Falling Into Space - Leading With Head
-
Task 6 (Explanation): Falling Into Space - Finding the Ground
-
Task 6 (Demonstration): Falling Into Space - Finding the Ground
-
All Together (Explanation)
-
All Together (Demonstration)
-
-
4
Class 3
-
Task 1 (Explanation): Shifting Squats to 1 Leg
-
Task 1 (Demonstration): Shifting Squats to 1 Leg
-
Task 2 (Explanation): Shifting Squat to Cossack
-
Task 2 (Demonstration): Shifting Squat to Cossack
-
Task 3 (Explanation): Combining Task 1-2
-
Task 3 (Demonstration): Combining Task 1-2
-
Task 4 (Explanation): Standing to Ground - Cossack Transitions
-
Task 4 (Demonstration): Standing to Ground - Cossack Transitions
-
Task 5 (Explanation): Sitting to Low Squat On Spot - Close Base
-
Task 5 (Demonstration): Sitting to Low Squat On Spot - Close Base
-
Task 5 (Demonstration): Sitting to Low Squat On Spot - Open Base
-
Task 6 (Explanation): Sitting to Quadrupedal - In Space
-
Task 6 (Demonstration): Sitting to Quadrupedal - In Space
-
All Together (Explanation)
-
All Together (Demonstration) - Set Order
-
All Together (Demonstration) - Random Order
-
-
5
Class 4
-
Task 1 (Explanation): Palms Outwards Open Base
-
Task 1 (Demonstration): Palms Outwards - Set Pattern
-
Task 1 (Demonstration): Palms Outwards
-
Task 2 (Explanation): Palms Outwards - Finding More Freedom
-
Task 2 (Demonstration): Palms Outwards - Finding More Freedom
-
Task 3 (Explanation): Palms Outwards - Single Leg
-
Task 3 (Demonstration): Palms Outwards - Single Leg
-
Task 4 (Explanation):Turns
-
Task 4 (Demonstration):Turns
-
Task 5 (Explanation): Arms - Windmill Variation & Diagonal Drop
-
Task 5 (Explanation 2): Arms - Windmill Variation & Diagonal Drop
-
Task 5 (Demonstration 1): Arms - Windmill Variation - The Pattern
-
Task 5 (Demonstration 2): Arms - Diagonal Drop - The Pattern
-
Task 5 (Demonstration 3): Arms - Windmill Variation & Diagonal Drop
-
All Together (Explanation)
-
All Together (Demonstration 1)
-
All Together (Demonstration 2)
-
-
6
Class 5
-
Task 1 (Explanation): 2 Points Footwork - Side-Side Focus
-
Task 1 (Demonstration): 2 Points Footwork - Side-Side Focus
-
Task 2 (Explanation): 2 Points Footwork - Front Back Focus
-
Task 2 (Demonstration): 2 Points Footwork - Front Back Focus
-
Task 2 (Demonstration 2): 2 Points - Front Back Focus
-
Task 3 (Explanation): 4 Points - Square - Footwork
-
Task 3 (Demonstration): 4 Points - Square - Footwork
-
Task 4 (Explanation): Open Base - Closing Space & Shifting Weight
-
Task 4 (Demonstration): Open Base - Closing Space & Shifting Weight
-
Task 5 (Explanation): Adding Head Hand Interaction
-
Task 5 (Demonstration): Adding Head Hand Interaction
-
Task 5 (Demonstration 2): Adding Head Hand Interaction
-
Task 6 (Explanation): 4 Points - Square - Low Positions Touching Ground
-
Task 6 (Demonstration): 4 Points - Square - Low Positions Touching Ground
-
Task 7 (Explanation): 4 points - Square - Footwork Hop and Jump
-
Task 7 (Demonstration): 4 points - Square - Footwork Hop and Jump
-
All Together (Explanation)
-
All Together (Demonstration 1)
-
All Together (Demonstration 2) - Loosing The Square - Free in Space
-
-
7
Class 6
-
Task 1 (Explanation): Step Away & Back
-
Task 1 (Demonstration): Step Away & Back
-
Task 2 (Explanation): Step Away & Back - Adding Head Motion
-
Task 2 (Demonstration): Step Away & Back - Adding Head Motion
-
Task 3 (Explanation): Adding The Shuffle Step
-
Task 3 (Demonstration): Adding The Shuffle Step
-
Task 3 (Demonstration 2): Shuffle Step + Spine
-
Task 4 (Explanation): All We Did Before - In Space
-
Task 4 (Demonstration): All We Did Before - In Space
-
Task 5 (Explanation): Adding The Pivot
-
Task 5 (Demonstration): Adding The Pivot
-
Task 6 (Explanation): Stepping + Sharp Squat to One Leg
-
Task 6 (Demonstration): Stepping + Sharp Squat to One Leg
-
All Together (Explanation)
-
All Together (Demonstration)
-
-
8
Class 7
-
Task 1 (Explanation): Spinal Rotations - Shifting Weight
-
Task 1 (Explanation): Spinal Rotations - Shifting Weight
-
Task 2 (Explanation): Spinal Rotations - Relaxing Spine & Using Gaze
-
Task 2 (Demonstration): Spinal Rotations - Relaxing Spine & Using Gaze
-
Task 3 (Explanation): Throwing Head - Spine Follows
-
Task 3 (Demonstration): Throwing Head - Spine Follows
-
Task 4 (Explanation): Prior Tasks - In Space
-
Task 4 (Explanation 2): Prior Tasks - In Space
-
Task 4 (Demonstration 1): Prior Tasks - In Space
-
Task 5 (Explanation 1): Arms - Elbows - Wrists Articulation
-
Task 5 (Explanation 2): Arms - Elbows - Wrists Articulation
-
Task 5 (Demonstration): Arms - Elbows - Wrists Articulation - On Spot
-
Task 5 (Demonstration 2): Arms - Elbows - Wrists Articulation - In Space
-
Task 6 (Explanation): Arms - Elbows - Wrists Articulation - Moving In One Line
-
Task 6 (Demonstration): Arms - Elbows - Wrists Articulation - On Spot
-
Task 6 (Demonstration 2): Arms - Elbows - Wrists Articulation - Moving In One Line
-
Task 7 (Explanation): Throwing Arm
-
Task 7 (Explanation 2): Throwing Arm
-
Task 7 (Demonstration): Throwing Arm
-
All Together (Explanation)
-
All Together (Explanation 2)
-
All Together (Demonstration)
-
-
9
Class 8
-
Task 1 (Explanation): Spine - Curving/Arching/Rotating
-
Task 1 (Demonstration): Spine - Curving/Arching/Rotating
-
Task 2 (Explanation): Deep Arch and Wave
-
Task 2 (Demonstration): Deep Arch and Wave - The First Encounter
-
Task 2 (Demonstration 2): Deep Arch and Wave
-
Task 3 (Explanation): Rotating Spine & Stepping
-
Task 3 (Demonstration): Rotating Spine & Stepping
-
Task 4 (Explanation): Spine Curve/Arch/Rotate - Curving in Space
-
Task 4 (Demonstration): Spine Curve/Arch/Rotate - Curving in Space
-
Task 5 (Explanation): Curving Feet & Circling Crab
-
Task 5 (Demonstration): Curving Feet & Circling Crab
-
All Together (Explanation)
-
All Together (Demonstration)
-
-
10
Class 9
-
Task 1 (Explanation): Researching Hip Movement
-
Task 1 (Demonstration): Researching Hip Movement
-
Task 2 (Explanation): Engaging Eyes & Dropping Upper Body
-
Task 2 (Demonstration): Engaging Eyes & Dropping Upper Body
-
Task 3 (Explanation): 1 leg & in space
-
Task 3 (Demonstration): 1 leg & in space
-
Task 4 (Explanation): Active Hip - From Standing to Low Position - 1 Leg
-
Task 4 (Demonstration): Active Hip - From Standing to Low Position - 1 Leg
-
Task 5 (Explanation): Dropping The Body Into Sitting
-
Task 5 (Demonstration): Dropping The Body Into Sitting
-
All Together (Explanation)
-
All Together (Demonstration)
-
-
11
Class 10
-
Task 1 (Explanation): Belly to Back - Gaze Leading
-
Task 1 (Demonstration): Belly to Back - Gaze Leading
-
Task 2 (Explanation): Creating and Passing Through Gates
-
Task 2 (Demonstration): Creating and Passing Through Gates
-
Task 3 (Explanation): Sitting to Lying
-
Task 3 (Demonstration): Sitting to Lying
-
Task 4 (Explanation): Standing to Sitting
-
Task 4 (Demonstration): Standing to Sitting
-
Task 5 (Explanation): Standing Waves
-
Task 5 (Demonstration): Standing Waves
-
All Together (Explanation)
-
All Together (Demonstration)
-