Soft Acrobatics & Improvisation
Course Series
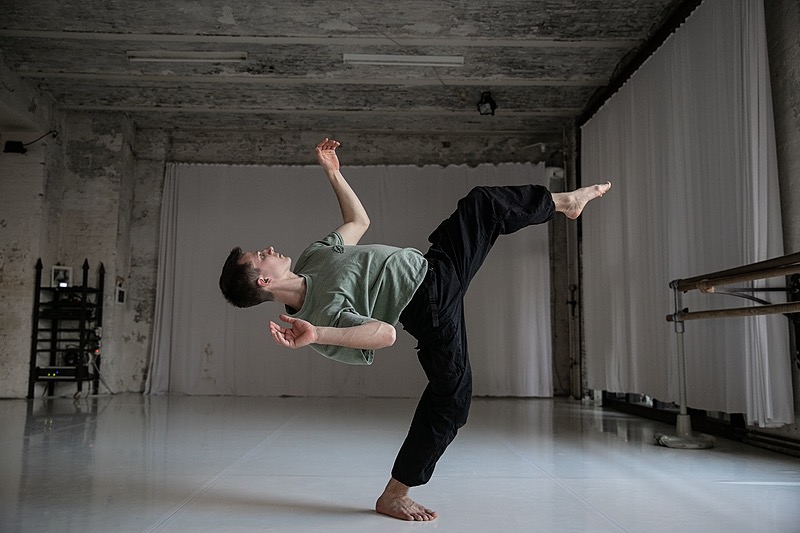
In the Soft Acrobatics & Improvisation series, we dive deeper into acrobatics, learning a variety of movements in a progressive, yet explorative and playful manner. This series is intended for those who want to deepen their acrobatic practice and become creative, authentic, and adaptable, able to flow and improvise, using acrobatics in an organic and imaginative way.
The acrobatic practice, at its peak, allows one to engage with their structure in an exuberant way, not just by learning and repeating sequences, but by improvising and moving freely in space, with a heightened awareness of one’s body and the space around it, in all its dimensions. The in between of acrobatics is as important as the acrobatics themselves. It shapes one’s movement and brings character and originality. To be a skillful acrobat is to be adaptable and creative, and this is what we aim for, this is what makes one feel free in their movement.
Each of our courses offers a deep exploration into movement, providing months to years of material to explore. Every series of online courses directly represents one or more pillars of our practice. In this series, the focus is on improvisation and acrobatics, involving task based exploration, progressive pattern learning, and coordination, standing, ground level, and floor work, in an intertwined and overlapping way across the chapters. The courses in each series can be explored independently, meaning you do not need to complete the first course in order to explore the second, and so on.
This series is not recommended as a first contact with Soft Acrobatics. For beginners, we offer a course, part of our large online teaching projects, On Soft Acrobatics: Fundamentals & Beyond. This course is not always available for purchase. To stay updated, subscribe to our newsletter, which you can find via the link in our Instagram bio.
With more than 10 years of experience teaching and practicing acrobatics, from kids to adults, and from beginners to professionals, we are here to share many of the insights we have gathered throughout our journey. Our acrobatic, dance, and movement practice is inspired by disciplines such as capoeira, breakdance, contemporary dance, grappling arts, and Fighting Monkey.
ALL OUR ONLINE COURSES OFFER LIFETIME ACCESS
Throughout the course, you’ll develop:
• a variety of new movements in soft acrobatics from different fields, unified under one practice
• improved coordination, balance, flexibility, and body and spatial awareness
• tools for creative movement exploration
• resources as both a practitioner and a teacher, allowing you to create supportive learning environments and facilitate research into improvisation and acrobatics
• improved coordination and flow at all levels: standing, ground (quadrupedal), and floor
• the ability to adapt and personalize your acrobatic vocabulary
• a playful approach to learning that supports long-term growth
• confidence to integrate acrobatics into your improvisation and move with greater freedom and presence
YOU CAN SEE THE CURRICULUM BELLOW
FAQ
-
Who is this course for?
Who is this course for? This course is for all movers interested in acrobatics and improvisation. For those who want to feel free and creative in their movement. It is for movers who already have some experience with acrobatics, not for complete beginners. It is for practitioners and teachers who want to better structure their practice and maximize learning, while keeping the practice alive, open, and fun.
-
What equipment or space is required?
Some chapters, or parts of different chapters, can be explored within the confines of your room, but most will require more space to move around, such as a studio room (dance/yoga/gym) or outdoors (park/sports court). We encourage practitioners to work with what they have and adapt the material to all spaces, as we do in our own practice. No equipment is needed. No equipment is needed.
-
How is the course structured?
The course consists of 10 chapters. Each chapter focuses on teaching a set of acrobatic movements and improvisation tasks. The emphasis is both on learning new movements and on creating context through improvisation. Each pattern or task is thoroughly explained and broken down in the Explanation Videos. Each step is then demonstrated again without commentary in the Demonstration Videos, offering a quick refresher and inspiration. The structure is not follow-along, but rather watch, explore, watch, explore cycle.
-
Do we have lifetime access?
Yes. All our courses offer lifetime access.
-
For US & Canada Customers - Multiple Instalments
If you would like to use a multiple instalment plan without additional regional taxes added at checkout, please reach out to us at: [email protected]
-
Refund Policy
Because this is a digital educational product with immediate access to the full course content, we offer a limited refund window under the following conditions: • Refund requests must be made within 3 days of purchase. • You must have accessed no more than 20% of each course included in your purchase. • If eligible, 80% of the payment will be refunded. • 20% is retained as an administrative fee. Refunds cannot be issued if more than 20% of any course has been viewed.
-
Split Payment Regulatio
Each month, you’ll be charged a specific amount on the date of your first payment, depending on whether you choose the 2, 3 or 4 installment option. Choosing a payment plan means you are committing to the full course fee. Instalments are offered as a convenience, not as a subscription, trial period, or partial-access model. By selecting a payment plan (2, 3 or 4 instalments), you agree to complete all scheduled payments. Access to the course or bundle during the instalment period is conditional. Course activity and progression are monitored to ensure usage aligns with normal learning patterns. If activity significantly exceeds what is typical before all instalments are completed, we reserve the right to: • temporarily restrict or suspend access • contact the student to clarify usage and ensure it aligns with the intended learning experience • require immediate settlement of the remaining balance if it is the case Cancellation of future instalments is not permitted once any course material has been accessed. Refunds, if applicable, are subject to the conditions stated in our Refund Policy.
-
Support Contact
If you have any questions or need support please reach out to humananimalproject.ou
Curriculum
-
1
Introduction
-
Disclaimer
-
Introduction
-
-
2
Class 1
-
Task 1 (Explanation): Falling Footwork
-
Task 1 (Explanation 2): Falling Footwork
-
Task 1 (Demonstration): Falling Footwork
-
Task 2 (Explanation): Jump Spin
-
Task 2 (Explanation 2): Jump Spin
-
Task 2 (Demonstration): Jump Spin
-
Pattern 1 (Explanation): The Scorpion Pass
-
A Tip For Exploration
-
Pattern 1 (Demonstration): Crossing Arms Wheel
-
Pattern 1 (Demonstration - Slow Motion): Crossing Arms Wheel
-
Pattern 1 (Demonstration): The Scorpion Pass
-
Pattern 1 (Demonstration - Slow Motion): The Scorpion Pass
-
Task 3 (Explanation): Integration - Falling, Spin Jump, Scorpion
-
Task 3 (Demonstration): Integration - Falling, Spin Jump, Scorpion
-
Pattern 2 (Explanation): Scorpion and Chapeu
-
Pattern 2 (Demonstration): Scorpion and Chapeu
-
Pattern 2 (Demonstration): Scorpion and Chapeu - Free In Space
-
Pattern 2 (Demonstration - Slow Motion): Scorpion and Chapeu
-
Pattern 2 (Demonstration - Slow Motion): Scorpion and Chapeu - Free In Space
-
Pattern 3 (Explanation): QDR Transition
-
Pattern 3 (Demonstration): QDR Transition - The Leg Drag
-
Pattern 3 (Demonstration): QDR Transition - The Entrance
-
Pattern 3 (Demonstration - Slow Motion): QDR Transition - The Entrance
-
Pattern 3 (Explanation): QDR Transition Full
-
Pattern 3 (Explanation - Slow Motion): QDR Transition Full
-
Pattern 3 (Explanation - Slow Motion): QDR Transition Full
-
Sequence (Demonstration): Scorpion, Chapeu, QDR Transition
-
Sequence (Demonstration - Slow Motion): Scorpion, Chapeu, QDR Transition
-
Task 4 (Demonstration): Connecting Acrobatic Movements
-
Task 5 (Explanation): Everything Together
-
Task 5 (Demonstration): Everything Together
-
-
3
Class 2
-
Task 1 (Explanation): Curving & Falling
-
Task 1 (Explanation II): Curving & Falling
-
Task 1 (Demonstration): Curving & Falling
-
Pattern 1 (Explanation): Falling Spiral Step
-
Pattern 1 (Demonstration): Falling Spiral Step
-
Pattern 1 (Demonstration): Falling Spiral Step - Open In Space
-
Task 2 (Explanation): Curving & Falling Spiral Step
-
Task 2 (Demonstration): Curving & The Falling Spin Step
-
Task 3 (Explanation): Curving Feet, Spiral Fall Step & Rolling Variations
-
Pattern 2 (Explanation): Side Roll Variation I
-
Pattern 3 (Explanation): Side Roll Variation II
-
Pattern 4 (Explanation): Side Roll Variation III
-
Pattern 2-3-4 (Explanation): Last Cues on Rolling Variations
-
Pattern 2 (Demonstration): Side Roll Variation I
-
Pattern 2 (Demonstration - Slow Motion): Side Roll Variation I
-
Pattern 3 (Demonstration): Side Roll Variation II
-
Pattern 3 (Demonstration - Slow Motion): Side Roll Variation II
-
Pattern 4 (Demonstration): Side Roll Variation III
-
Pattern 4 (Demonstration - Slow Motion): Side Roll Variation III
-
Task 3 (Demonstration): Curving Feet, Spiral Fall Step & Rolling Variations
-
Task 4 (Explanation): Curving Feet, Spiral Fall Step & Front Cartwheel
-
Pattern 5 (Explanation + Demonstration): The Front Cartwheel Progression
-
Pattern 5 (Demonstration - Slow Motion): The Front Cartwheel - The Entrance
-
Pattern 5 (Demonstration - Slow Motion): The Front Cartwheel - The Fall & Lift
-
Pattern 5 (Demonstration - Slow Motion): The Front Cartwheel - Final
-
Task 4 (Demonstration): Curving Feet, Spiral Fall Step & Front Cartwheel
-
Task 5 (Explanation): All Together
-
Task 5 (Explanation II): All Together
-
Task 5 (Demonstration): All Together
-
-
4
Class 3
-
Task 1 (Explanation): QDR (Elbow Lever) - Relaxing Into It
-
Task 1 (Demonstration): QDR (Elbow Lever) - Relaxing Into It
-
Task 2 (Explanation): Low Dive Into QDR
-
Task 2 (Demonstration): Low Dive Into QDR
-
Task 3 (Explanation): Diving Into Hands and Rebuilding On Axis
-
Task 3 (Demonstration): Diving Into Hands and Rebuilding On Axis
-
Task 4 (Explanation + Demonstration): Diving From Standing Into QDR
-
Task 5 (Explanation): QDR From Lying Down
-
Task 5 (Demonstration): QDR From Lying Down
-
Task 5 (Demonstration 2): QDR From Lying Down - Adding Details
-
Task 6 (Explanation): Bridge to QDR
-
Task 6 (Demonstration): Bridge to QDR - The Entrance
-
Task 6 (Demonstration): Bridge to QDR In Space
-
Task 6 (Demonstration 3): Bridge to QDR - Side - Side Loop
-
Task 7 (Explanation): Integration - Set Hierarchy of Tasks
-
Task 7 (Demonstration): Integration - Set Hierarchy of Tasks
-
Task 8 (Explanation): Details To Lying Down to QDR + All Together
-
Task 8 (Demonstration): Details To Lying Down to QDR
-
Task 8 (Demonstration): Details To Lying Down to QDR + All Together
-
-
5
Class 4
-
Task 1 (Explanation): Side - Side - Back Arch In Space
-
Pattern 1 (Demonstration): Side - Side - Back
-
Pattern 1 (Demonstration - Slow Motion): Side - Side - Back
-
Pattern 2 (Demonstration): Side - Side - Back Arch
-
Pattern 2 (Demonstration-Slow Motion): Side - Side - Back Arch
-
Task 1 (Demonstration): Side - Side - Back + Arch - In Space (Simple Version)
-
Task 1 (Demonstration): Side - Side - Back + Arch - In Space (Complex Version)
-
Pattern 3 (Explanation): The Windmill
-
Pattern 3 (Demonstration): The Windmill
-
Pattern 3 (Demonstration - Slow Motion): The Windmill
-
Pattern 3 (Demonstration): The Windmill - Open Base Variation
-
Pattern 3 (Demonstration-Slow Motion): The Windmill - Open Base Variation
-
Task 2 (Explanation): Side - Side - Back + Arch + Windmill In Space
-
Task 2 (Demonstration): Side - Side - Back + Arch + Windmill In Space
-
Pattern 4 (Explanation): Knees Up Jump
-
Pattern 4 (Explanation): Knees Up Barrel
-
Pattern 5 (Explanation): Open Barrel - First Step - Baby Barrel
-
Pattern 5 (Explanation): Open Barrel - Final Step
-
Pattern 4 (Demonstration): Knees Up Jump Progression
-
Pattern 4 (Demonstration-Slow Motion): Knees Up Jump Progression
-
Pattern 5 (Demonstration): Open Barrel - First Step - Baby Barrel
-
Pattern 5 (Demonstration - Slow Motion): Open Barrel - First Step - Baby Barrel
-
Pattern 5 (Demonstration): Open Barrel
-
Pattern 5 (Demonstration - Slow Motion): Open Barrel
-
Task 3 (Explanation): All Previous Variations Together - Open Play
-
Task 3 (Demonstration): All Previous Variations Together - Open Play
-
Task 3 (Explanation): All Together
-
Task 3 (Demonstration): All Together
-
-
6
Class 5
-
Task 1 (Explanation): Articulating Shoulders in Shifting Squat
-
Task 1 (Demonstration): Articulating Shoulders in Shifting Squat
-
Task 2 (Explanation): Head - Shoulders Relationship
-
Task 2 (Demonstration): Head - Shoulders Relationship
-
Task 3 (Explanation): Shoulders - Feet Relationship in Space
-
Task 3 (Demonstration I): Shoulders - Feet Relationship in Space - Small Steps
-
Task 3 (Demonstration II): Shoulders - Feet Relationship in Space - Large Steps
-
Task 3 (Demonstration ): Shoulders - Feet Relationship in Space - Small & Large Steps
-
Pattern (Explanation 1): Standing Macaco - Progression 1-2
-
Pattern/Task (Explanation 2): Standing Macaco - Full Over The Shoulder - Further Exploration
-
Pattern (Demonstration): Standing Macaco - Progression I: Open Arch Descend & Rebuild
-
Pattern (Demonstration): Standing Macaco - Progression II: Open Arch Descend & Rebuild Reaching Arm
-
Pattern (Demonstration): Standing Macaco - Progression III: The Twist
-
Pattern (Demonstration): Standing Macaco - Progression IV: Gradually Increasing The Jump
-
Pattern (Demonstration): Standing Macaco Full Over The Shoulder
-
Pattern (Demonstration Slow Motion): Standing Macaco Full Over The Shoulder
-
Pattern (Explanation): Standing Macaco Arched Variation
-
Pattern (Demonstration): Standing Macaco Arched Variation
-
Pattern (Demonstration Slow Motion): Standing Macaco Arched Variation
-
Task 4 (Demonstration): Standing Macaco
-
Task 4 (Demonstration - Slow Motion): Standing Macaco
-
Pattern (Explanation): One Arm Front Wheel
-
Pattern (Demonstration 1): One Arm Front Wheel - Progression
-
Pattern (Demonstration 2): One Arm Front Wheel
-
Pattern (Demonstration 2 - Slow Motion): One Arm Front Wheel
-
Combo (Explanation): High Macaco - 1 Arm Front Cartwheel - Exploring Connection
-
Combo (Demonstration): High Macaco - 1 Arm Front Cartwheel - Step I
-
Combo (Explanation): High Macaco - 1 Arm Front Cartwheel - Open Exploration
-
Combo (Demonstration): High Macaco - 1 Arm Front Cartwheel - Open Exploration
-
Task 5 (Explanation): All Together
-
Task 5 (Demonstration): All Together
-
-
7
Class 6
-
Task 1 (Explanation): Curving Feet & Stepping Under
-
Task 1 (Demonstration): Curving Feet & Stepping Under
-
Task 2 (Explanation): Stepping Under - Deep Off Axis
-
Task 2 (Demonstration): Stepping Under - Deep Off Axis - Progression
-
Task 2 (Demonstration - Slow Motion): Stepping Under - Deep Off Axis
-
Task 2 (Demonstration): Stepping Under - Deep Off Axis - In Space
-
Task 3 (Explanation): Double Tale Lizard
-
Pattern (Demonstration): Double Tale Lizard
-
Pattern (Demonstration - Slow Motion ): Double Tale Lizard
-
Task 3 (Demonstration): Curving - Double Tale Lizard - In Space
-
Task 4 (Explanation): Double Tailed Lizard to Air Bridge
-
Task 4 (Demonstration): Double Tailed Lizard to Air Bridge
-
Task 5 (Explanation): Air Bridge to Belly
-
Task 5 (Demonstration): Air Bridge to Belly
-
Task 6 (Explanation): Finding Spirals
-
Task 6 (Demonstration ): Finding Spirals
-
Task 7 (Explanation): All Together
-
Task 7 (Demonstration): All Together
-
-
8
Class 7
-
Task 1 (Explanation): On One Leg - Moving Through Shapes
-
Task 1 (Demonstration): On One Leg - Moving Through Shapes
-
Pattern (Explanation): The Helicopter - Progression - Exercise 1 and 2
-
Pattern (Demonstration): The Helicopter - Progression - Exercise 1
-
Pattern (Demonstration): The Helicopter - Progression - Exercise 2
-
Pattern (Explanation): The Helicopter - Progression - Exercise 3 (Leg Circle - Overarm Projection)
-
Pattern (Demonstration): The Helicopter - Progression - Exercise 3 (Leg Circle - Overarm Projection)
-
Pattern (Demonstration - Slow Motion): The Helicopter - Progression - Exercise 3 (Leg Circle - Overarm Projection)
-
Pattern (Explanation): The Helicopter - Progression - Exercise 4 (Helicopter to Squat)
-
Pattern (Demonstration): The Helicopter - Progression - Exercise 4 (Helicopter to Squat)
-
Pattern (Explanation): The Helicopter - Progression - Exercise 5 (Helicopter to Table Top)
-
Pattern (Explanation II): The Helicopter - Progression - Exercise 6-7 (Tabletop to Standing, Standing to Table Top)
-
Pattern (Demonstration): The Helicopter - Progression - Exercise 5 (Helicopter to Table Top)
-
Pattern (Demonstration - Slow Motion): The Helicopter - Progression - Exercise 5 (Helicopter to Table Top)
-
Task 2 (Demonstration): Helicopter To Squat/Table Top in Space
-
Task 3/Pattern (Explanation): Helicopter to Standing
-
Pattern (Demonstration): Helicopter to Standing
-
Pattern (Demonstration-Slow Motion): Helicopter to Standing
-
Task 3 (Demonstration): Spinal Waves to Helicopter
-
Task 4 (Explanation): Helicopter - Redirecting Movement With Leg
-
Task 4 (Demonstration): Helicopter - Redirecting Movement With Leg
-
Task 4 (Demonstration - Slow Motion): Helicopter - Redirecting Movement With Leg
-
Task 5 (Explanation): Crossing Legs Ground Level
-
Task 5 (Demonstration): Crossing Legs Ground Level
-
Task 6 (Explanation): Wandering Leg Into Front Cartwheel
-
Task 6 (Demonstration): Wandering Leg Into Front Cartwheel
-
Pattern (Explanation): Helicopter Into Front Cartwheel
-
Pattern (Demonstration): Helicopter Into Front Cartwheel - Exercise 1
-
Pattern (Demonstration - Slow Motion): Helicopter Into Front Cartwheel - Exercise 1
-
Pattern (Demonstration ): Helicopter Into Front Cartwheel Full
-
Pattern (Demonstration - Slow Motion): Helicopter Into Front Cartwheel Full
-
Task 7 (Explanation): Spinal Waves into Helicopter - Front Cartwheel
-
Task 7 (Demonstration): Spinal Waves into Helicopter - Front Cartwheel
-
Task 8 (Explanation): Everything Together - 2 Variations
-
Task 8 (Demonstration): All Together - Full Score With Front Wheel
-
Task 8 (Demonstration): All Together - Full Score Without Front Wheel
-
-
9
Class 8
-
Task 1 (Explanation): Shifting Squat - Articulating Spine to One Leg
-
Task 1 (Demonstration): Shifting Squat - Articulating Spine to One Leg
-
Task 2 (Explanation): Quadrupedal - Exploring Legs On and Off the Ground
-
Task 2 (Demonstration): Quadrupedal - Exploring Legs On and Off the Ground
-
Task 3 (Explanation): Spinning Hook Step
-
Task 3 (Demonstration): Spinning Hook Step
-
Task 3 (Demonstration - Slow Motion): Spinning Hook Step
-
Task 4A (Exploration): High Bridge Transition
-
Task 4B (Explanation): High Bridge - Lifting Leg
-
Task 4C (Explanation): One Leg Bridge Turn
-
Task 4D (Explanation): Floating Leg/HeadTail, Spin Hook Step and Bridge Variations
-
Task 4A (Demonstration): High Bridge Transition
-
Task 4B (Demonstration): High Bridge - Lifting Leg
-
Task 4C (Demonstration): One Leg Bridge Turn
-
Task 5 (Explanation): Overhead Bridge
-
Task 5 (Explanation 2): Overhead Bridge
-
Pattern (Demonstration): Overhead Bridge Looping
-
Task 5 (Demonstration): Ground Movement + Overhead Bridge
-
Task 6 (Explanation): Integrating Floating Leg + Spinning Hook Step + Overhead Bridge
-
Task 6 (Demonstration): Integrating Floating Leg + Spinning Hook Step + Overhead Bridge
-
Pattern A1 (Explanation): Low Bridge to Back Roll Qdr
-
Pattern A2 (Explanation): Low Bridge
-
Pattern A3 (Explanation): QDR - Finding Comfort
-
Pattern A1 (Demonstration): Low Bridge to Back Roll Qdr
-
Pattern A1 (Demonstration - Slow Motion): Low Bridge to Back Roll Qdr
-
Task 7 (Explanation): Floating Leg + Spinning Hook Step + Low Bridge Back Roll QDR
-
Task 7 (Demonstration): Floating Leg + Spinning Hook Step + Low Bridge Back Roll QDR
-
Pattern (Explanation): Low Barrel
-
Pattern (Demonstration): Low Barrel
-
Pattern (Demonstration - Slow Motion): Low Barrel
-
Task 8 (Explanation): Floating Leg, Spin Hook Step, Low Barrel
-
Task 8 (Demonstration): Floating Leg, Spin Hook Step, Low Barrel
-
Task 9 (Explanation): All Together
-
Task 9 (Demonstration): All Together
-
-
10
Class 9
-
Task 1 (Explanation): Swinging Arms in Open Squat
-
Task 1 (Demonstration 1): Swinging Arms in Open Squat
-
Task 1 (Demonstration 2): Swinging Arms in Open Squat
-
Task 2 (Explanation): Open Squat - Descending Articulating Spine Circles and Arches
-
Task 2 (Demonstration): Open Squat - Descending Articulating Spine Circles and Arches
-
Task 2 (Explanation): Low Open Squat - Swinging Arms Front/Side/Back
-
Task 2 (Demonstration I): Low Open Squat - Swinging Arms Front/Side/Back
-
Task 2 (Demonstration II): Low Open Squat - Swinging Arms Front/Side/Back
-
Task 3 (Explanation): Controlled Inversions
-
Task 3 (Demonstration): Controlled Inversions
-
Task 4 (Explanation): Low Open Squat + Arm Swings + Head-Tail Spiral + Controlled Inversions
-
Task 4 (Demonstration): Low Open Squat + Arm Swings + Head-Tail Spiral + Controlled Inversions
-
Pattern (Explanation): Side Arched Wheel
-
Pattern (Demonstration 1): Side Arched Wheel
-
Pattern (Demonstration 2): Side Arched Wheel
-
Task 5 (Explanation): Low Squat + Arm Swings + Arched Side Wheel
-
Task 5 (Demonstration): Low Squat + Arm Swings + Arched Side Wheel
-
Pattern (Explanation): Progression - Macaco Into Inversion
-
Pattern (Explanation 2): Progression - Macaco Into Inversion
-
Pattern (Demonstration): The Macao - The Swing Twist (Excerpt from Soft Acrobatics: Fundamentals & Beyond)
-
Pattern (Demonstration): The Macaco - Gradual Progression (Excerpt from Soft Acrobatics: Fundamentals & Beyond)
-
Task (Demonstration): Macaco Over The Rope (Excerpt from Soft Acrobatics: Fundamentals & Beyond)
-
Pattern (Demonstration): Progression - Macaco Into Inversion - Exercise 1: Over Head Reach Bridge
-
Pattern (Demonstration): Progression - Macaco Into Inversion - Exercise 2: Back Walkover
-
Pattern (Demonstration): Progression - Macaco Into Inversion - Exercise 3: Back Walkover From Squat
-
Pattern (Demonstration): Macaco to Handstand
-
Pattern (Demonstration - Slow Motion): Macaco to Handstand
-
Task 6 (Explanation -Demonstration): Ground Movement + Macaco to Handstand
-
Pattern (Explanation): Macaco Twist to Handstand - Falling Into Front Wheel Progression
-
Pattern (Explanation 2): Macaco Twist to Handstand - Falling Into Front Wheel Progression
-
A Tip For Exploration
-
Pattern (Demonstration): Exercise 1 - Falling From Handstand Into Front Wheel
-
Pattern (Demonstration): Exercise 2 - Macaco to Handstand Into Front Wheel
-
Pattern (Demonstration): Exercise 3 - Macaco Twist to Tucked Handstand
-
Pattern (Demonstration - Slow Motion): Exercise 3 - Macaco Twist to Tucked Handstand
-
Pattern (Demonstration): Exercise 4 - Handstand Twist Front Wheel
-
Pattern (Demonstration-Slow Motion): Exercise 4 - Handstand Twist Front Wheel
-
Pattern (Demonstration): Exercise 5 - Macaco Twist Wheel - Tuck Variation
-
Pattern (Demonstration - Slow Motion): Exercise 5 - Macaco Twist Wheel - Tuck Variation
-
Pattern (Demonstration): Exercise 5 - Macaco Twist Wheel - Extended Variation
-
Pattern (Demonstration-Slow Motion): Exercise 5 - Macaco Twist Wheel - Extended Variation
-
Task 7 (Explanation): Ground Movement - Macaco Twist - Front Cartwheel
-
Pattern (Demonstration): Macaco Twist - Front Cartwheel Progression
-
Pattern (Demonstration - Slow Motion): Macaco Twist - Front Cartwheel Progression
-
Task 7 (Demonstration): Ground Movement - Macaco Twist - Front Cartwheel
-
Task 8 (Explanation): All Together
-
Task 8 (Demonstration): All Together
-
Task 8 (Demonstration 2): All Together
-
-
11
Class 10
-
Task 1 (Explanation): Small Base - Waves Back of the Head - Standing/Quadrupedal
-
Task 1 (Demonstration): Small Base - Waves Back of the Head - Standing/Quadrupedal
-
Task 2 (Explanation): Waves Back of the Head in Space
-
Task 2 (Demonstration): Waves Back of the Head in Space
-
Task 3 (Explanation): Waves Back of the Head + Arching In Space
-
Task 3 (Demonstration): Waves Back of the Head + Arching In Space
-
Task 4 (Explanation): Waves Back of the Head + Arching Into The Ground
-
Task 4 (Demonstration): Waves Back of the Head + Arching Into The Ground
-
Pattern (Explanation): Crossing Arms Jumping Side Fish - Progression
-
Pattern (Demonstration): Floating On Belly
-
Pattern (Demonstration): Pushing Side Travel
-
Pattern (Demonstration): Side Fish
-
Pattern (Demonstration - Slow Motion): Side Fish
-
Pattern (Demonstration): Rocking Fish
-
Pattern (Demonstration - Slow Motion): Rocking Fish
-
Pattern (Demonstration): Crossing Arms Jumping Side Fish
-
Pattern (Demonstration - Slow Motion): Crossing Arms Jumping Side Fish
-
Task 5 (Explanation): Waves Back of the Head + Scorpion + Side Fish
-
Task 5 (Demonstration): Waves Back of the Head + Scorpion + Side Fish
-
Pattern (Explanation): The Roundhouse 360 Kick
-
Pattern (Demonstration): The Roundhouse 360 Kick
-
Pattern (Explanation): Meia Lua De Compasso
-
Pattern (Demonstration): Meia Lua De Compasso
-
Pattern (Demonstration - Slow Motion): Meia Lua De Compasso
-
Pattern (Explanation): Parafuso/Jumping 360 Roundhouse Kick
-
Pattern (Demonstration): Parafuso/Jumping 360 Roundhouse Kick - Step 1-3: Knees UP, Knees Up Jump, Full Kick
-
Pattern (Demonstration - Slow Motion): Parafuso/Jumping 360 Roundhouse Kick - Step 1: Knees UP
-
Pattern (Demonstration - Slow Motion): Parafuso/Jumping 360 Roundhouse Kick - Step 2: Knees UP Jump
-
Pattern (Demonstration - Slow Motion): Parafuso/Jumping 360 Roundhouse Kick - Step 3: Full Kick
-
Task 6 (Explanation): Exploring Kicks In Space
-
Task 6 (Demonstration): Exploring Kicks In Space
-
Pattern (Explanation): Meia Lua Dive/Over Hand Meia Lua
-
Pattern (Demonstration): Meia Lua Dive - Step 1: Stoping Kick
-
Pattern (Demonstration): Meia Lua Dive - Step 2: Turning Into Crab
-
Pattern (Demonstration): Meia Lua Dive/Over Hand Meia-Lua - Step 3: Final
-
Pattern (Demonstration-Slow Motion): Meia Lua Dive/Over Hand Meia-Lua - Step 3: Final
-
Task 7 (Explanation): All Together
-
Task 7 (Demonstration I): All Together
-
Task 7 (Demonstration II): All Together
-